

11 Ways to Capture Great Photos in Low Light
To master photography, it is important to understand how to work with your camera and your surroundings. Often, the lighting conditions can’t be perfect, but with the right technique, you can turn even the lowest light into stunning images. In this guide, we’ll explore eight effective ways to take great low-light photos without relying on a bright flash.
1. Embrace a wide aperture
When faced with low-light conditions, choosing a larger aperture setting is beneficial. Choose a lower f-stop number, such as f/5.6, as this allows more light into the lens than higher values such as f/18. Adopting a large aperture ensures high light absorption, enabling you to capture subjects in brilliant light and detail.
In challenging low-light scenarios where slow shutter speeds come into play, eliminating any camera shake becomes critical for sharp, clear images. This can be achieved in several ways. Using a reliable tripod and using your camera’s timer or shutter release cable are effective ways to reduce camera shake. Additionally, many cameras have built-in stabilization features to combat blur caused by shake. The availability of this feature may vary depending on your camera brand. Nikon cameras offer Vibration Reduction (VR), Canon adds Image Stabilization (IS), and Sony adopts SteadyShot INSIDE, among others.
By implementing these techniques and maintaining stability, you can successfully conquer slow shutter speeds and achieve flawless results in low-light situations. The combination of a large aperture setting and effective shake reduction ensures that your images capture the beauty of the moment with remarkable clarity and brightness.
2. Boost ISO Settings
Adjusting the ISO on your digital camera determines its sensitivity to light. Higher ISO settings such as 400 or 800 allow more light in, which is useful for low-light photography, but they can introduce image noise. For sharp images, lower ISO settings such as 100 or 200 are preferred.
Even if you take a photo with image noise, you can still enhance its artistic appeal by printing it on unique materials like woodblock prints or classic silver metal prints. Raw material appears in areas of low saturation, softening imperfections in the image and adding an artistic touch.
Overall, mastering ISO settings and exploring creative printing options can help you achieve stunning and visually appealing images even in challenging lighting conditions.
3. Use a slow shutter speed with stabilization

When faced with slow shutter speeds in low-light situations, achieving sharp photos is crucial, and camera shake must be avoided. To accomplish this, using a tripod and employing your camera’s timer or a shutter release cable can be highly effective. Another option is to utilize the built-in stabilization features of your camera, which can be located either on the camera body or the lens, depending on the brand. Nikon cameras feature Vibration Reduction (VR), Canon has Image Stabilization (IS), and Sony incorporates SteadyShot INSIDE, among other brand-specific names for image stabilization.
By stabilizing your camera effectively, you can ensure that even with slow shutter speeds, the risk of blurriness due to shaky hands is minimized. This is particularly beneficial in low-light conditions where longer exposure times are necessary to capture well-exposed images. Whether you opt for a tripod, or a timer, or utilize built-in stabilization, mastering these techniques will elevate the quality of your low-light photography and lead to sharper, more impressive results.
4. Introduce external light sources
Enhance your photos and overcome flat, dull lighting by incorporating external light sources. These additional lights serve as powerful tools to eliminate harsh shadows and infuse your images with vibrancy. A portable reflector is a valuable asset in your photography arsenal, allowing you to bounce light onto your subject and create a soft, flattering appearance. Not only does it bring out the best in your subjects, but it also effectively reduces dark shadows, especially when shooting under direct sunlight. Embrace the art of manipulating light to capture stunning, well-lit photographs that leave a lasting impression.
5. Find bright areas for articles
To enhance the quality of your photographs, consider relocating your subjects to areas with better lighting. While reflectors can be helpful, sometimes it’s not feasible to have them on hand, which is where naturally well-lit locations come into play. By positioning your subjects in brighter areas, you ensure that they are beautifully illuminated, resulting in stunning shots that truly stand out.
Natural light can work wonders for your photography, adding a soft and flattering glow to your subjects. Look for spots with ample sunlight or well-lit backgrounds to create a captivating visual impact. Whether you’re capturing portraits or any other type of imagery, selecting well-lit settings can make a significant difference in the overall appearance of your photographs. So, the next time you’re planning a photoshoot or snapping pictures spontaneously, keep in mind the power of good lighting and its ability to elevate the quality of your photoshoots.
6. Invest in Fast Lenses
If you own a DSLR camera and find yourself frequently engaging in low-light photography, investing in a new lens can significantly enhance your results. Choose a sharp lens, characterized by its wide aperture — typically f/1.4, f/1.8, or f/2.8. These lenses are ideal for low-light situations because they allow your camera to collect more light, resulting in brighter and clearer images. The wide aperture also facilitates fast shutter speeds, reducing the risk of camera shaking and ensuring sharp images.
Upgrading to a faster lens can be a game changer, especially in challenging lighting conditions. Whether you’re photographing indoor events, evening cityscapes, or dimly lit scenes, a sharp lens gives you the power to embrace the creative possibilities of low-light photography. The ability to effectively manipulate light opens up a world of captivating imagery, allowing you to achieve professional-looking shots that leave a lasting impression on viewers. So, if you’re ready to take your low-light photography to new heights, a sharp lens is the perfect addition to your camera gear.
7. Master White Balance Settings
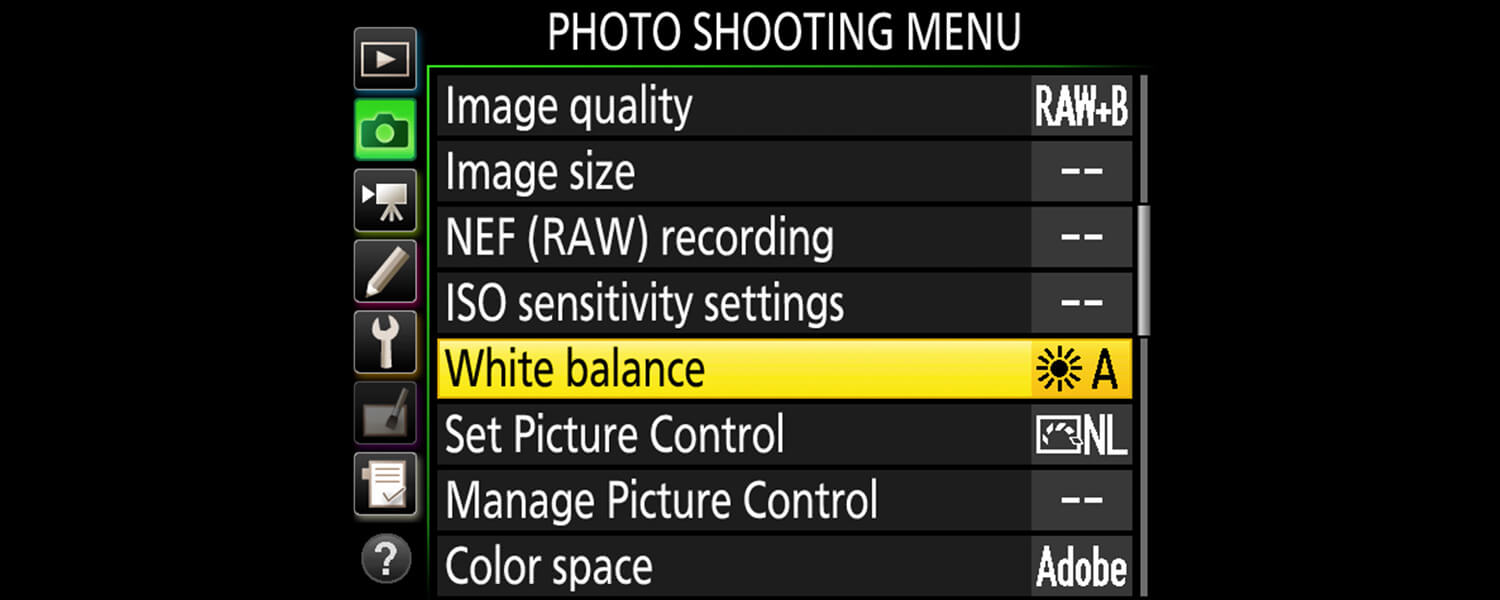
When faced with challenging low-light conditions, achieving accurate and vibrant colors in your photos becomes critical. An effective way to combat a washed-out or washed-out look is to adjust your digital camera’s white balance. Basically, customizing the white balance tells your camera how to perceive the white in your image, and allows it to make the necessary adjustments to capture colors more faithfully. This adjustment is especially important to avoid unwanted colors, such as yellow, orange, or blue, which can negatively affect the overall quality of your photos.
By calibrating the white balance to match the specific type of lighting you’re working with, you can ensure that your photos display natural, true-to-life colors. Whether you’re shooting under warm indoor lighting, cool outdoor shades, or mixed light sources, customizing the white balance empowers you to capture scenes with better accuracy and vibrancy. Adopting this technique not only elevates the visual appeal of your photos but also allows you to unleash your creativity and create stunning images even in the challenging lighting environment
8. Get creative with black and white

If you find yourself in low-light situations and prefer to avoid the hassle of adjusting your camera’s white balance, there’s a simple yet effective solution to capturing stunning images without a flash. Consider switching to black-and-white mode for your photography. By doing this, you can eliminate any concerns about color issues altogether.
Shooting in black and white not only bypasses the need for white balance adjustments but also adds an artistic flair to your photos. This allows you to focus on the interplay of light and shadow while emphasizing texture and form in your composition. In low-light situations, black-and-white photography can be especially appealing, creating a sense of drama and depth that color photos don’t always achieve.
With this approach, you can freely explore the beauty of low-light photography without being constrained by color distractions. By embracing the timeless allure of black and white, you open new avenues for creativity and storytelling through your images, leaving a lasting impression on viewers. So, the next time you’re faced with dim lighting and want to capture remarkable shots, consider venturing into the fascinating world of black-and-white photography.
9. Shoot in RAW format

For more post-processing flexibility, shoot in RAW format. RAW images retain all the data captured by your camera sensor, allowing you to fine-tune exposure and colors during editing without sacrificing image quality.
Mastering low-light photography opens up a world of creative possibilities. By exploring large apertures, slow shutter speeds with stability, external light sources, and black and white, you can get great shots in challenging lighting conditions. Remember to adjust your white balance settings and shoot in RAW format to further enhance your images during post-processing. With these expert tips, you’ll embrace low-light situations with confidence and create exceptional photos that leave a lasting impression.
10. Post-Processing Techniques
Utilizing photo editing software can be beneficial in enhancing your low-light photography, but it’s essential to set realistic expectations. While post-processing allows you to address issues like image noise caused by high ISO settings, convert images to black and white, and adjust various aspects like contrast, brightness, shadows, highlights, and sharpness, it can’t perform miracles. Remember that editing can significantly improve a good photo, but it may not be able to transform a poorly taken photo into something extraordinary.
When dealing with low light conditions, editing can be a useful tool to refine and fine-tune your images, bringing out the best in them. However, it’s always advisable to strive for the best possible shot right from the moment you press the shutter button. By paying attention to lighting, composition, and other elements during the actual photo capture, you lay the foundation for a more successful and satisfying editing process later on. Keep in mind that photo editing is an art in itself, and with practice and skill, it can complement and enhance your photography work to create stunning visuals that truly captivate your audience.
11. Experimentation and Dedicated Practice
Mastering low-light photography takes time and practice; it’s not something that happens overnight unless you’re a natural prodigy. Just like any skill, becoming great at it requires experimentation and dedication. Begin by capturing non-moving subjects to minimize the risk of blurry images, and incorporate the photography tips mentioned earlier into your approach. If a particular technique doesn’t yield the desired results, don’t be discouraged; instead, try adjusting your camera settings and try again.
The key to success in low-light photography lies in continuous practice and experimentation. Be patient with yourself and allow room for learning from mistakes. By persistently honing your skills and trying different approaches, you’ll gradually become more comfortable shooting in low-light conditions, producing crisp and clear shots without relying on a flash. Embrace the journey of improvement and growth, and in due time, you’ll be capturing stunning low-light photos with confidence and expertise.


